Want to receive a text if there’s a bump in the night? Want an SMS if your cat is drinking from the toilet again? Want to get a text if a snooping parent or sibling comes in your room? This is a project for you!
We’re going to use an ESP8266 based WiFi prototyping development board - the Adafruit Feather HUZZAH and IoT platform Losant to send an SMS when an intruder is detected.
If you’re not familiar with Losant, Losant provides a simple way for generating visualization of all your data from all of your Internet of Things devices in customizable dashboards. Losant also allows you to respond to events coming from your devices like sending you an email when one of your devices measures a low moisture reading for one of your plants. Or even better, when your moisture sensing device measures low moisture, Losant can send a command to the watering device to start the watering cycle. The great thing is that you can modify the logic of the interaction between the devices in the Losant web app without modifying a line of code on any of your devices. This can all be done through an intuitive UI. You’ll see that in action in this project.
You’ll need the following components for this project.
A Passive Infrared (PIR) sensor works by detecting the infrared radiation from an object - like a human or animal.
Each PIR sensor can have different pin outs. I’m using the Parallax 555-28027 PIR Sensor. If you face the sensor toward you the pins from left to right are, out to signal, power and ground. OUT will send a HIGH signal once an infrared body is detected by the sensor. Here’s a illustration of the sensor and pin out.
Here’s what the Adafruit Feather HUZZAH looks like - big style!
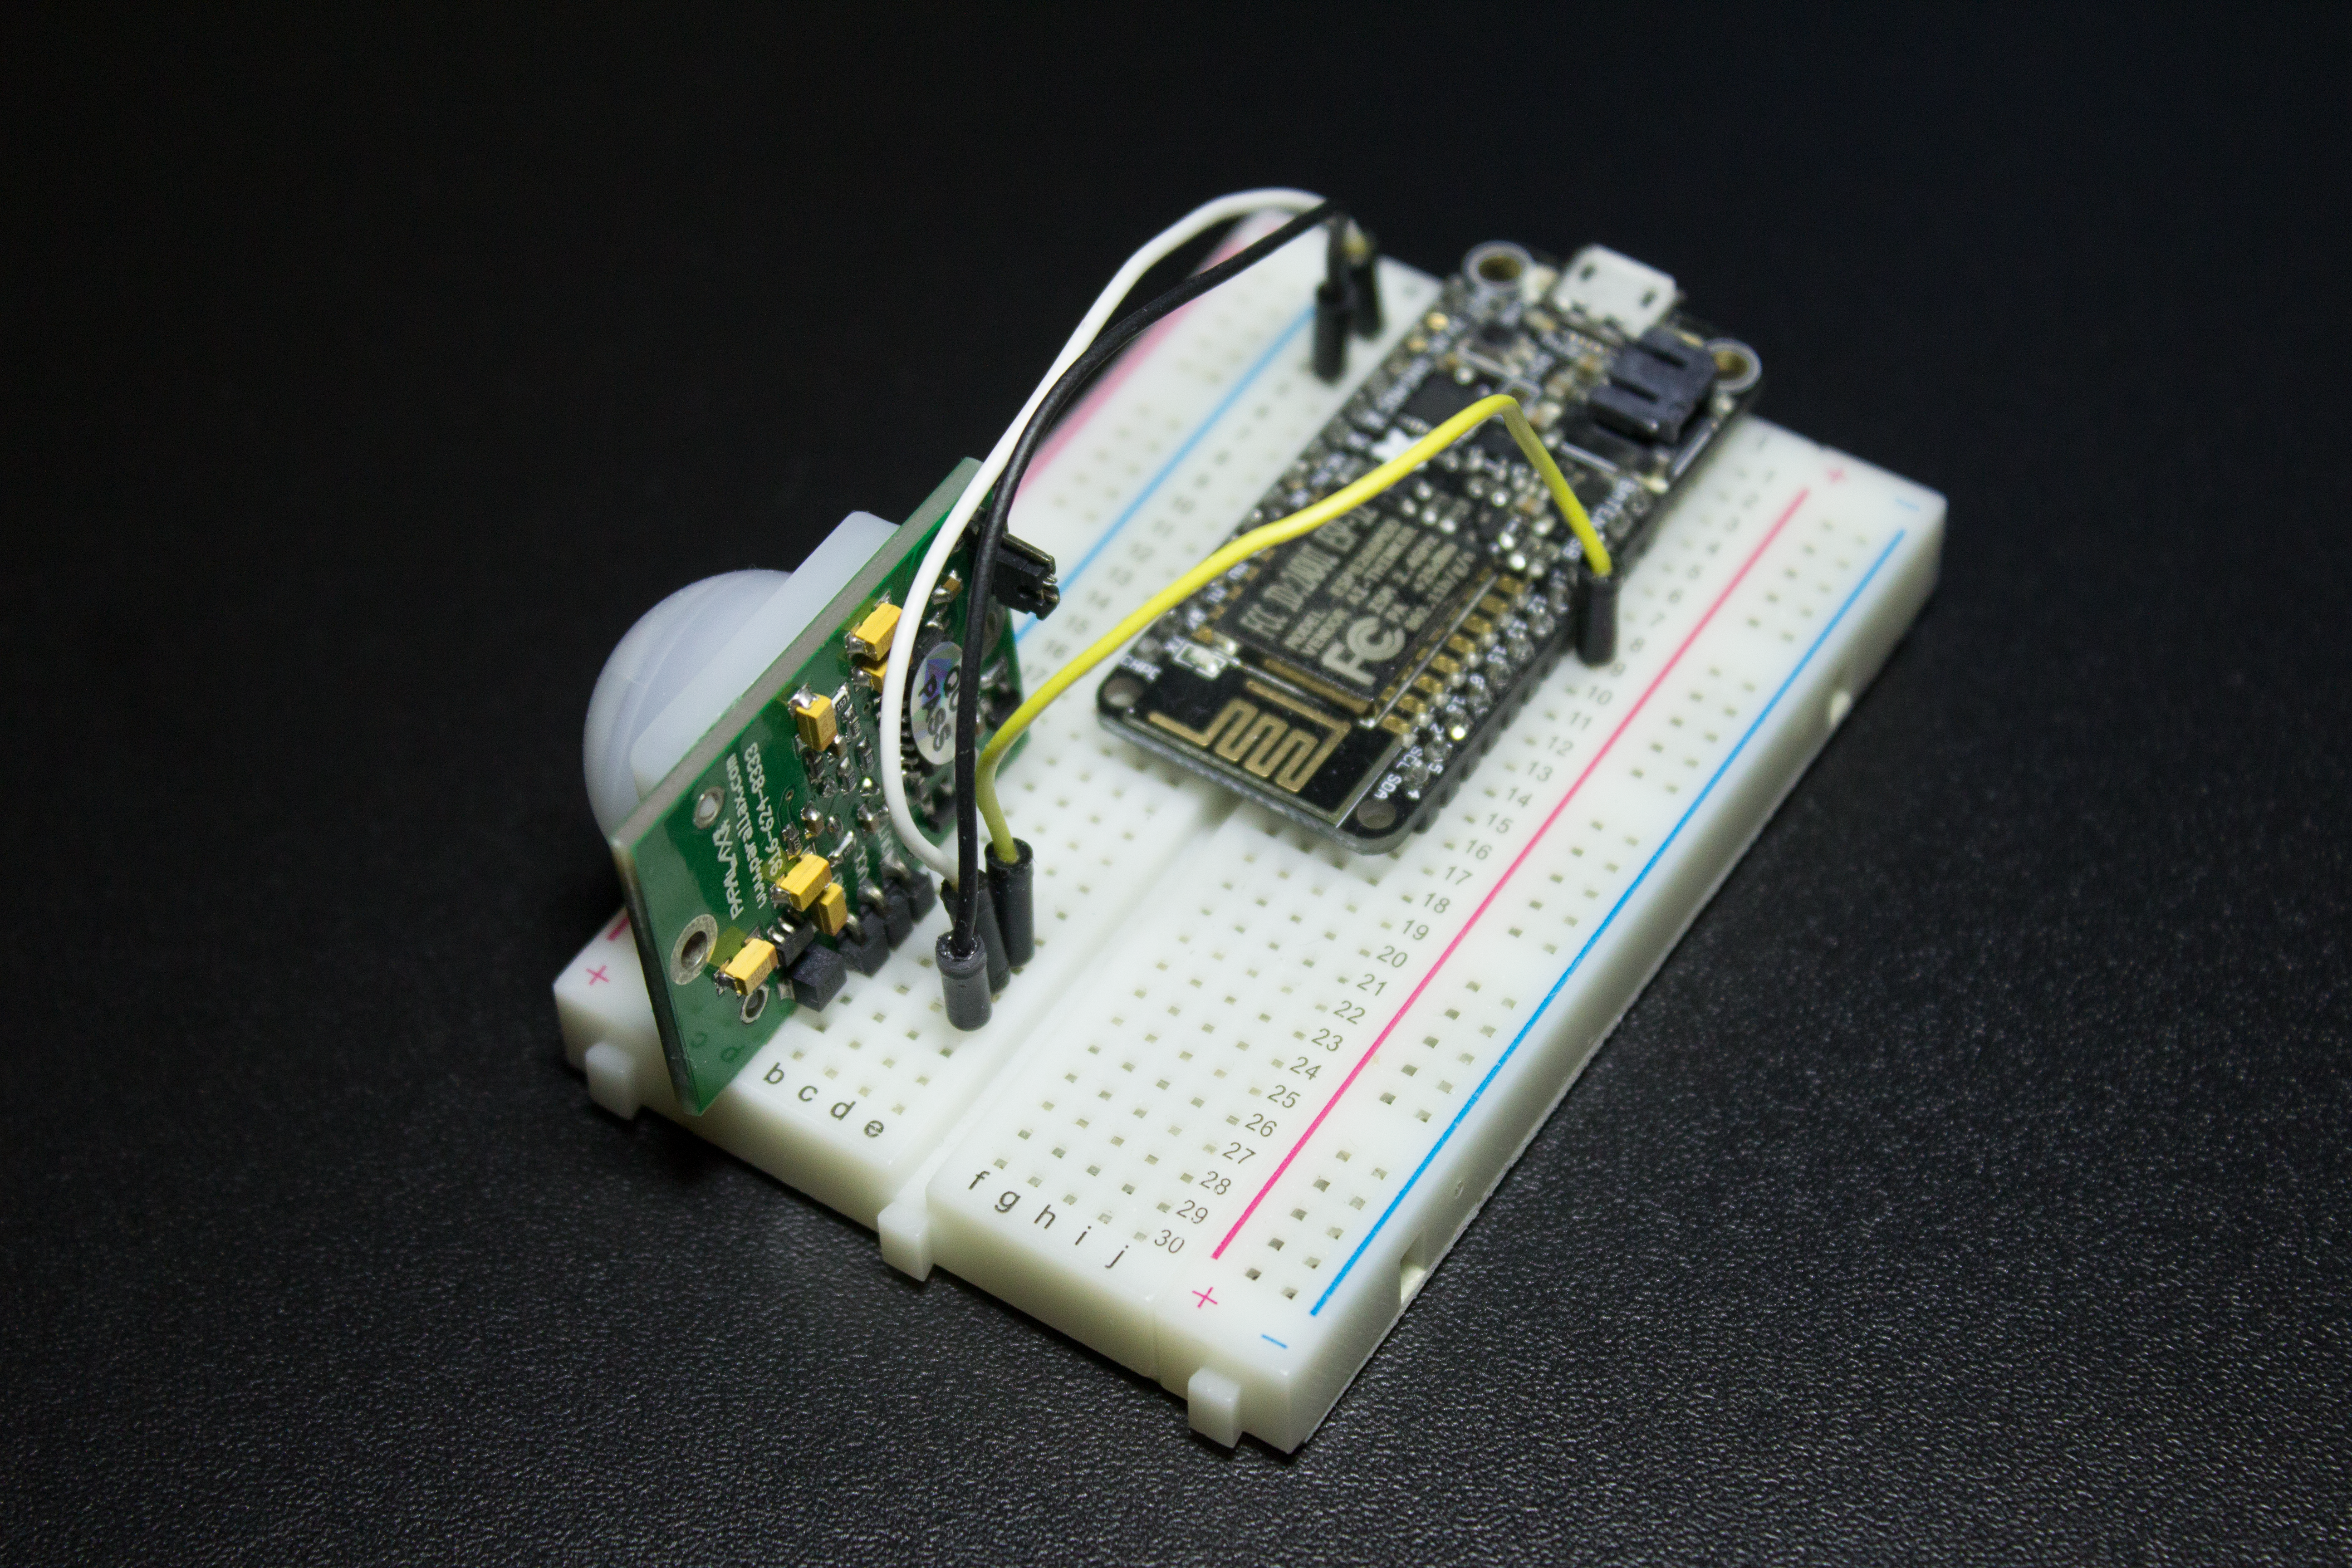
Wire up the VCC on the PIR sensor to 3V on the HUZZAH, the GND pin on the PIR sensor to the GND on the HUZZAH. The sensor should be working now. There’s a red LED that comes on when the sensor detects a body. Finally connect the OUT from the PIR sensor to any digital pin on the HUZZAH. I picked 12 .
Here’s how it looks IRL .

For further reading on the PIR sensor visit the Parallex Website or Adafruit’s Learning System for the Feather HUZZAH.
The Adafruit Feather HUZZAH is Arduino compatible, so we’ll be using the Arduino IDE. If you’re new to Arduino you should check out The Absolute Beginner’s Guide to Arduino.
The Arduino IDE doesn’t come working “out-of-the-box” with the Feather HUZZAH. To get it up and running take a quick detour to Adafruit’s Learning Guide. When the IDE has been set up, let’s get ready to code.
Our Arduino code needs to do the following things:
The Arduino code is below and requires the Losant mqtt library for Arduino. See the README.md for other dependencies.
12345678910111213141516171819202122232425262728293031323334353637383940414243444546474849505152535455565758596061626364656667686970717273747576777879808182838485868788899091
#include#include// WiFi credentialsconst char* WIFI_SSID = "";const char* WIFI_PASS = "";// Losant credentialsconst char* LOSANT_DEVICE_ID = "";const char* LOSANT_ACCESS_KEY = "";const char* LOSANT_ACCESS_SECRET = "";const int MOTION_PIN = 12;int motionState = 0;WiFiClientSecure wifiClient;LosantDevice device(LOSANT_DEVICE_ID);// Connect to WiFivoid connect() {WiFi.begin(WIFI_SSID, WIFI_PASS);while(WiFi.status() != WL_CONNECTED) {delay(500);}device.connectSecure(wifiClient, LOSANT_ACCESS_KEY, LOSANT_ACCESS_SECRET);unsigned long connectionStart = millis();while(!device.connected()) {delay(500);// If we can't connect after 5 seconds, restart the board.if(millis() - connectionStart > 5000) {// Failed to connect to Losant, restarting board.ESP.restart();}}//Device should be connected now and is now ready for use!}// Reconnects if requiredvoid reconnect()bool toReconnect = false;// If the WiFi or HUZZAH is not connected to Losant - we should reconnectif(WiFi.status() != WL_CONNECTEDif(toReconnect) {connect();}}void motionDetected() {// Losant uses a JSON protocol. Construct the simple state object.// { "motion" : true }StaticJsonBuffer200> jsonBuffer;JsonObject& root = jsonBuffer.createObject();root["motion"] = true;// Send the state to Losant.device.sendState(root);}void setup() {pinMode(MOTION_PIN, INPUT);connect();}void loop() {reconnect();device.loop();// Read the sensorint currentRead = digitalRead(MOTION_PIN);// If motion is detected we don't want to 'spam' the serviceif(currentRead != motionState) {motionState = currentRead;if(motionState) {motionDetected();}}delay(100);}
Fill in your SSID for WIFI_SSID and WiFi password for WIFI_PASS .
This only leaves the Losant credentials.
To connect to Losant you require 3 things:
If you haven’t signed up to Losant yet, do that now at Losant.com - it’s free for our use case.
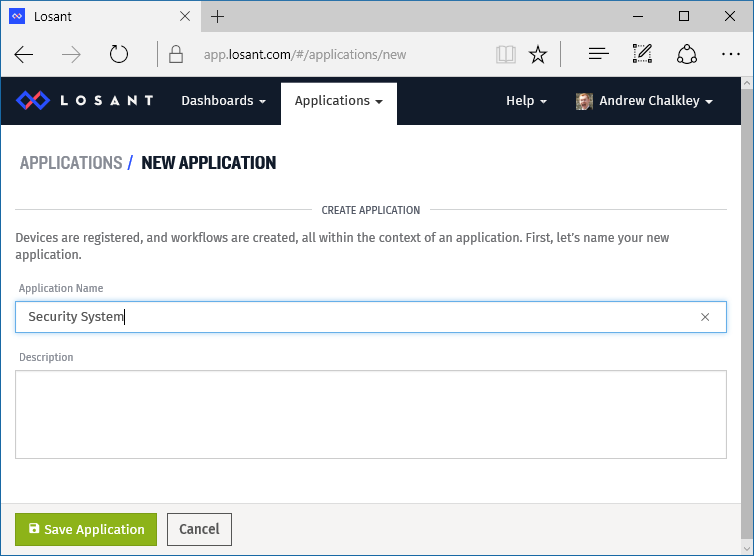
First we need to create an application by going to Applications > + Create Application from the drop down menus.
I’m calling mine Security System.
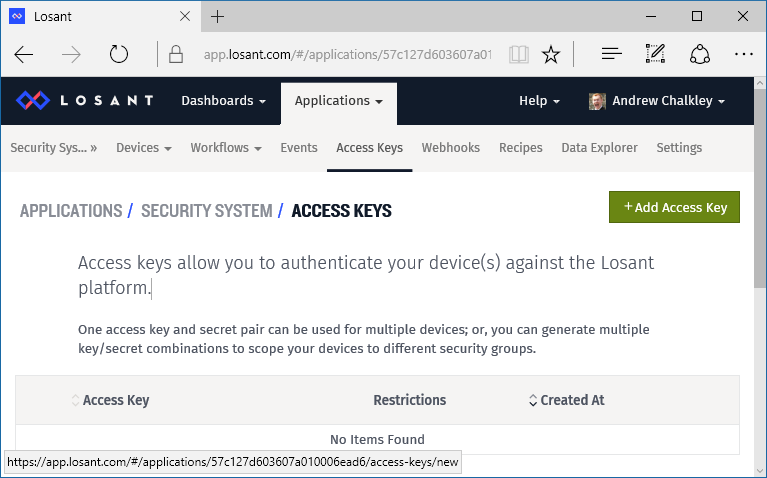
Now we can create an Access Key. Visit the Access Keys link, then + Add Access Key.
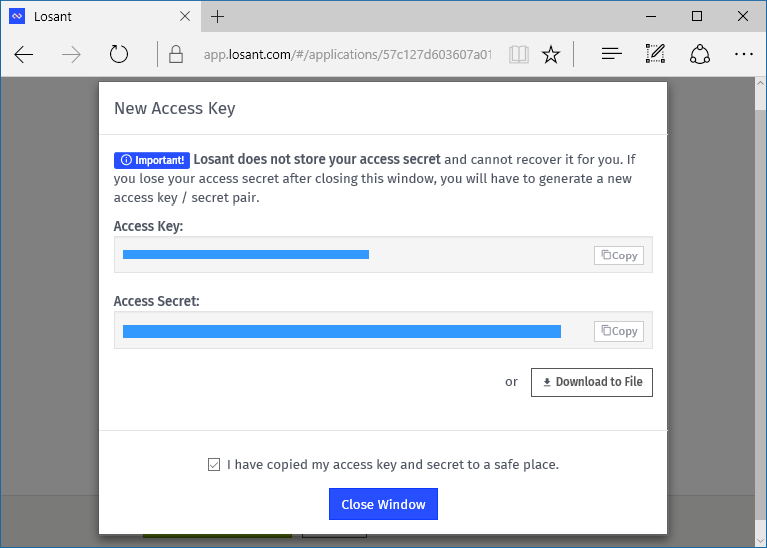
Then, simply press Create Access Key for All Devices. You’ll be presented with an Access Key and Access Secret. These will be LOSANT_ACCESS_KEY and LOSANT_ACCESS_SECRET respectively in your Arduino code. Keep your secret safe. If you loose it you have to regenerate it and update all your devices with the new secret.
Now we need to create a device to get a Device ID to put in to our Aruino code to assign to the LOSANT_DEVICE_ID constant.
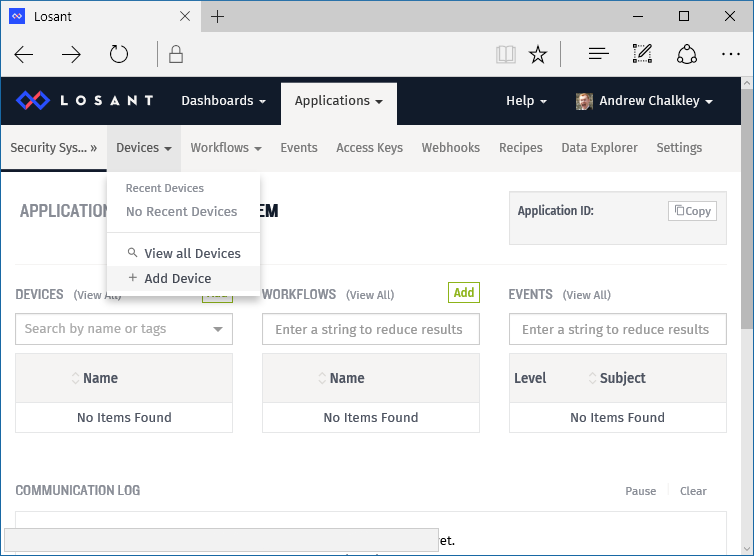
Then click on Create Blank Device.

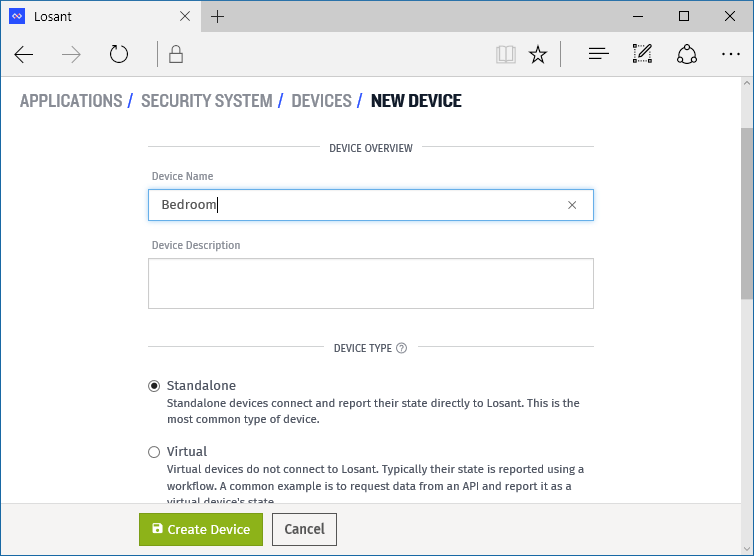
Then we can create a new device. Let’s give the device a Name of Bedroom since this is going to be where the device will be. Then keep the Device Type set to Standalone, since it connects directly to Losant.
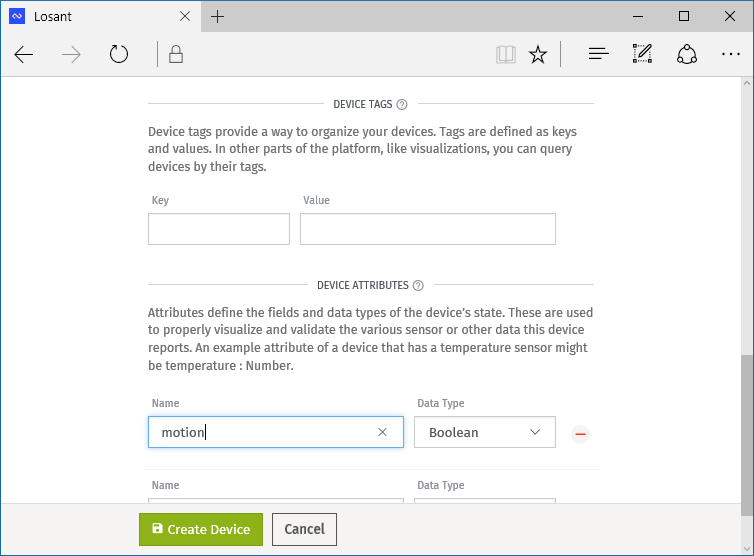
Then you can specify the Device Attributes that the device will send to Losant. In our case it’s a boolean value of motion . You can have as many device attributes as you’d like, like a temperature reading or humidity reading. Device attributes are contained in the JSON that we send from the device in the motionDetected() function to Losant.
Then click Create Device. You’ll now get a Device ID. You can copy and paste that for your LOSANT_DEVICE_ID .
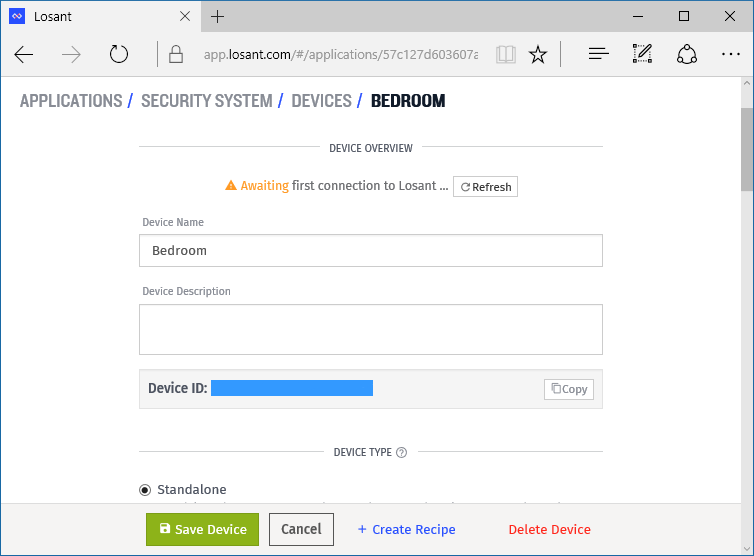
Awesome, we have all the required strings for the Arduino Skecth. Update the values for LOSANT_DEVICE_ID , LOSANT_ACCESS_KEY and LOSANT_ACCESS_SECRET and Upload your Arduino Sketch to the Adafruit Feather HUZZAH.
The final step is to get Losant to send us a text message when the motion state is true . To do this we need to create a Workflow. A Workflow is work triggered by your device’s states. In our case we want Losant to send an SMS message (the work) when the motion event occurs and is the value of true .
Create a Workflow from the drop down menus.
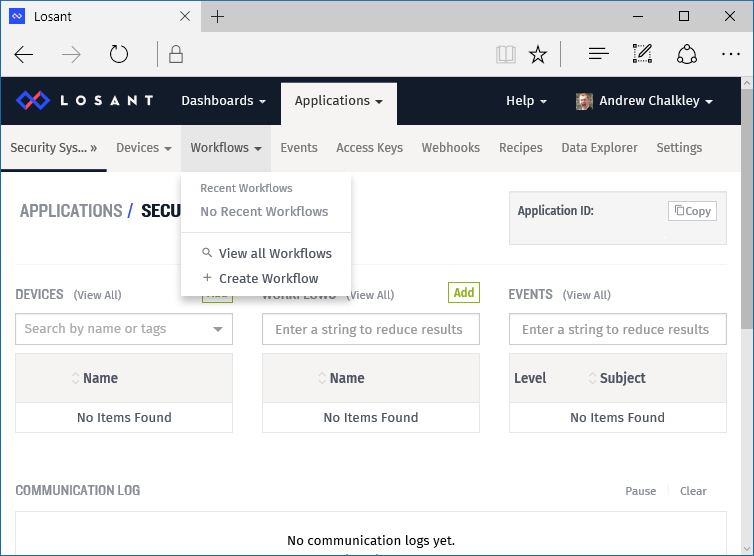
Enter in a Workflow Name like Send Notification or Send SMS and press Save Workflow.
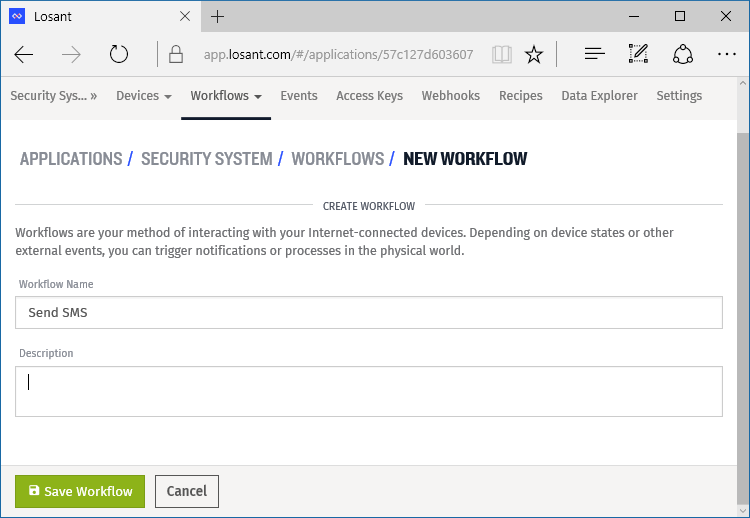
You are now presented with a simple drag and drop interface to create your workflow. First drag Device from Triggers in to the grid in the center of the screen.
Your browser does not support the video tag.
Then drag Conditional from the Logic panel.
Your browser does not support the video tag.
We then want to add the expression of…
> == true …in the Expression section of the Conditional panel.
Your browser does not support the video tag.
Now let’s drag SMS from the Output section and type in your cell phone number in the Phone Number Template.
Your browser does not support the video tag.
Then connect the nodes of the workflow together. Be sure to connect the green connection point on the Conditional to the SMS node. This means the condition has evaluated to true.
Your browser does not support the video tag.
Oh, let’s not forget to include a Message Template of Motion Detected! .
Your browser does not support the video tag.
Finally, we Deploy Workflow, meaning it’s ready to work when events come in.
Unplug your device and set it up where you want to have it.
Now it’s time to see if it works!
Your browser does not support the video tag.
And it does! Awesome!
Losant limits the SMS service to 1 per minute, which is fine for our purposes, but you can integrate with third party services such as telecom API provider Twilio which doesn’t have that restriction.
Taking the project further, you may want to add a button to “Arm” the device, with an LED indicator, so it doesn’t send the motion detection JSON when you’re expecting movement.
If you like this project why not give it some Respect on Hackster.io?
The Internet of Things has the opportunity to tap into the talent of millions of web developers, today. It fails to do so because of friction.
If the tools don’t improve it will never happen. I hate seeing wasted potential. I want to see what people can create given familiar tools - JavaScript, in a modern workflow.
Today marks our first step toward breaking down those barriers into IoT development with the release of Flasher.js. Flasher.js is the first development tool by thingsSDK.
thingsSDK‘s mission is to create a set of common APIs for Internet of Things devices in JavaScript. Ideally, the APIs could be reimplemented on any embedded JavaScript runtime or even in Node.js. The first step is making it easy getting JavaScript on to cheap, affordable microcontrollers. Then, provide the APIs and a modern workflow.
Flasher.js is a simple cross-platform app that allows you to install JavaScript runtimes (and others) to ESP8266 WiFi enabled microcontrollers.
Download it now!
This should work on all ESP8266 (ESP-12) development boards. A list of tested boards are below:
Many thanks to Craig Dennis who did the heavy lifting writing the internal module that flashes the device and Mat Helme for the logo and UI designs.
Flasher.js is open source if you’d like to help write documentation, test devices, write tests and add improvements come join us on GitHub. Also, consider joining us on the JavaScript and the Internet of Things Slack.
A common misconception with evolution comes from the phrase “survival of the fittest”. It doesn’t mean the fastest or the strongest organism. It’s not about it’s fitness on the race track, it’s about it’s ability to fit in to it’s environment. Whilst some adaptations seem extremely fine tuned, a closer look reveals that organisms have bizarre features and traits. For example the recurrent laryngeal nerve.
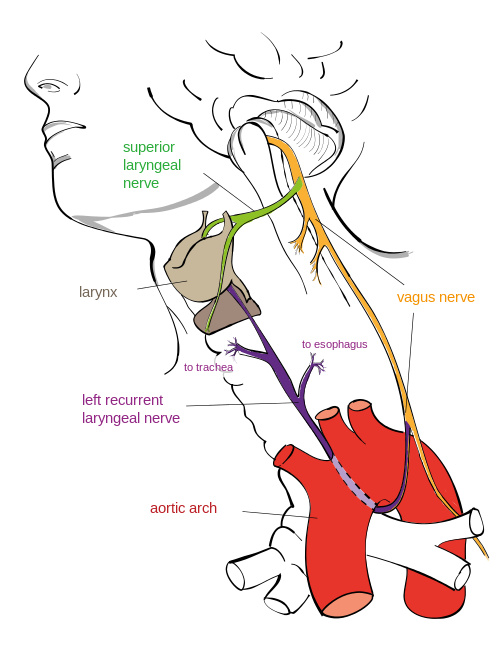
Image by Jkwchui - Creative Commons Attribution-Share Alike 3.0 Unported
The recurrent laryngeal nerve, branches off from the vagus nerve that sprouts out of the back of a head. Instead of branching off and going directly to the larynx (the voice box), it takes a tour down to the chest, loops under the aortic arch and travels back up to the larynx. This could sprout out earlier and take a direct route to the larynx, but it doesn’t.
In fact it’s true for the the Giraffe too.

Steve Garvie - Attribution-Share Alike 2.0 Generic
Instead of being a direct 2 inches in length, it’s over several feet. No engineer would ever design a system like that…right? So why is it there? History and legacy.
In our fish-like ancestors the brain, the gills and heart were close together. It was more direct for the laryngeal-equivalent nerve to go from the brain to the gills. But over time, gradually, as the biology of the fish turned in to the biology of a mammal and the neck began to evolve the heart went in to the chest and the laryngeal nerve got “trapped”. There was no reason for the nerve to “jump” from one side of the aortic arch to the other. So when it comes to modern day animals, there’s no way that their going to spontaneously loose this trait. There’s too much legacy genetics.
However if modern futuristic super hero (or super villain) genetic engineers were to design a new giraffe with a short, direct laryngeal nerve, it could be a monumental task. As they tweak one gene, other things may get switched on or off, say the development of the eyes or an extra pair of nipples! They may get it to jump over the aortic arch but it still may be several feet in length. And that may be good enough before resources run out.
The main take away is that external constraints can cause natural or artificial selection to produce seemingly-illogical design decisions. It’s illogical to a modern day engineer, but when you take in the genetic cost to re-write things it just wouldn’t happen. In fact it’s perfectly reasonable why it is the way it is when you take in to consideration the cost and other environmental factors.
Over the course of a career in computer programming you come across bizarre, obscene and down right insecure code. In fact you don’t need to be a developer to hear the latest reports on how the Internet or some device is broken.
The Internet, its protocols, infrastructure and the devices connected to it are good enough to survive in the environment. If it weren’t they wouldn’t be here. They’re fast enough, cheap enough, secure enough, enough to survive and even thrive.
There’s a mix of devices and software out there, for different environments or markets. For the consumer, for the enterprise and for the state. Each with their own constraints on resources, legacy and history.
Every computer program written on a modern operating system is just a veneer of a dizzying spiral of complexity where so many things could go wrong. Each part with so many weaknesses or attack vectors.
These were created by error, lack of time or budget, by poor design or even because of the laws of physics.
Systems, like organisms, can often have glaring problems that can be trivially scoffed at but the cost of creating something that works in all scenarios, in all environments, is easy to use, cheap, is 100% secure and maintainable is unrealistic.
We may get frustrated with patches and updates every time we switch on our device of choice or start our game but there’s so much that could go wrong! It’s everything to do with the environmental pressures in which the computer, phone, operating system or piece of software arises from and how that environment is in constant flux.
A complete rewrite of the anscestry of your computer hardware or software is unlikely to happen!
Hello World, and welcome to That Maker Show with me, chalkers, your host to all things new in the maker movement.
This week we’re talking about a new Raspberry Pi, Johnny Five Robots and an awesome Kickstarter project.
Monday saw the release of the Raspberry Pi model B+. Described as not ““Raspberry Pi 2″, but rather the final evolution of the original Raspberry Pi.”
It sports 40 GPIO pings, 2 more USB ports, push-push micro SD socket, lower power consumption, better auto and a neater form factor with four squarely-placed mounting holes; all for the same price!
Most resellers had them for launch and they’re still in stock in most places. Ladyada did a full breakdown of improvements, changes and gotchas.
James of XRobots gave an update on his half size Johnny Five project. James was waiting for J5GURU and team to release the Johnny Five Robot CAD files, which has happened in the last month. Terry, the J5GURU, on his YouTube Channel goes over the history of the project, some awesome 3D printing tips and the current state of the project.
You can get access to the CAD files by emailing Terry. Details are on his Facebook page and on his videos.
This week’s awesome Kickstarter project is BiscuitBoard.
BiscuitBoard is a solderless prototyping board. The main idea of the board is that you can make prototypes a lot faster with out the need of soldering.
You simply push the electronic components and wiring through and cut off the excess on the other side of the through-hole.
To illustrate how strong the grip on the components are, they show a wire in the Biscuit board lift a 500ml bottle of liquid. Awesome!
So if you want to rapidly create prototypes after you’ve nailed your breadboarded project, maybe the BiscuitBoard is for you!
Once again, thanks for watching, remember to subscribe for your weekly dose of maker news.
Hit me up @chalkers on twitter if you have any stories you’d like me to cover. If they don’t make it into the show I’ll include them as notable mentions in the show notes.
Hello World, and welcome to That Maker Show with me, chalkers, your host to all things new in the maker movement.
This week we’re talking about DIY Gameboys, phones, crowd fabricated chairs and an awesome Kickstarter project.
This week Adafruit launched a tutorial to build your own Gameboy clone called the PiGRRL. It uses a Raspberry Pi, a 2.8” TFT screen and a hacked SNES Controller. All you need access to is a 3D printer to print the enclosure. You can load up a NES or MAME emulator and play some 8-bit classics.
Also this week Adafruit released their first cell phone module FONA. It can be used for voice, SMS and data. It’s only 2G but should be good for most hobbyist projects.
If you’re building your own smart phone or need your project to send you data this module looks like a great solution to your DIY cellular problems.
Joris Laarman Lab launched the Makerchair, a project to bring full size affordable furniture available to all. By breaking designs into many small parts they were able to radically expand the number of devices for the chairs to be made on. Basically, any consumer 3D printer. The 3D parts can be assembled into a piece of furniture like a big 3D puzzle.
Sign up to their project on Wevovler to get your hands on the beta files.
This week’s awesome Kickstarter project is the mBuino.
The mBuino is a keychain based microcontroller. It can be programmed with the online mbed IDE. You can select a plain circuitboard to a fully functional populated board. There’s even pads on the back there you can attach a battery holder for a coin battery.
Once again, thanks for watching, remember to subscribe for your weekly dose of maker news.
Hit me up @chalkers on twitter if you have any stories you’d like me to cover. If they don’t make it into the show I’ll include them as notable mentions in the show notes.
Hello World, and welcome to That Maker Show with me, chalkers, your host to all things new in the maker movement.
This week we’re talking about a Raspberry Pi Star Fox clone, DIY humanoid robots, Xenomorph cosplay and an awesome Kickstarter project.
A group of first year students at the Imperial College London came together and created a version of Star Fox from scratch using the ARM assembly language. It’s a bare metal project, meaning there’s no need for an operating system. The game is the only thing that’s running.
For details check out their Github page which includes a pinout for a NES controller.
Project platform, Wevolver, shared a video on the InMoov robot. It’s the world’s first Open Source 3D printed humanoid life-sized robot.
You can 3D print it and put it together yourself. This is really amazing!
Go check out the project on the Wevolver site and see what you need to build it!
James Bruton of XRobots is in the middle of a Xenomorph Alien Cosplay project.
In his latest video he shows how he printed the right arm, using Ninjaflex and ABS. In a previous video he did the hand. Subscribe to his channel for hint, tips and tutorials, including how to build your own Iron Man costume.
This week’s awesome Kickstarter project is Printeer - a 3D printer for kids and schools.
This 3D printer doesn’t need a PC, complex software or fancy configuration settings. All you need is an iPad, WiFi and your finger.
Children can draw their creations on to the iPad and send them to the printer. This looks like a great first step on the 3d printing ladder for young children.
Once again, thanks for watching, remember to subscribe for your weekly dose of maker news.
Hit me up @chalkers on twitter if you have any stories you’d like me to cover. If they don’t make it into the show I’ll include them as notable mentions in the show notes.
Hello World, and welcome to That Maker Show with me, chalkers, your host to all things new in the maker movement.
This week we’re talking about the National Day of Making, print recycled material, printed tattoos and an awesome Kickstarter project.
Wednesday saw the first White House Maker Faire. A number of people from the Maker Movement were there, from the folks at Tindie to Massimo Banzi of Arduino.
For what it’s worth, Barack Obama, declared that June 18th is the National Day of Making. I say make everyday an international day of making, amirite?
Black Eye Peas rapper, Will.i.am, in his role as creative officer at 3D systems and co-founder of Ekocycle, is launching a PET plastic 3D printer. PET plastic is normally found in soft drink bottles.
It looks like you’ll still need to buy spools of the plastic, but it feels we’re getting closer to the future where we can recycle our household waste and create useful things with it.
Over on instructables there’s project that converts a MakerBot into a tattoo printer. It’s both scary and awesome at the same time.
For some designs this could work really well and would test you trust in technology! I wouldn’t get a tattoo anyway, even if it was a human or robot doing it. But it’s interesting hack…I wonder when we’ll see your MakerBot doing keyhole surgery!
This week’s awesome Kickstarter project is LazerBlade.
LazerBlade is a kit based laser cutter and engraver. It comes in kit form and looks simple to put together.
It cuts and engraves wood, paper, leather and acrylic. It includes all the software you need and looks user friendly.
If you want to get etching support the project now.
Once again, thanks for watching, remember to subscribe for your weekly dose of maker news.
Hit me up @chalkers on twitter if you have any stories you’d like me to cover. If they don’t make it into the show I’ll include them as notable mentions in the show notes.
Hello World, and welcome to That Maker Show with me, chalkers, your host to all things new in the maker movement.
This week we’re talking about the biggest open source patent release in history, a NES Keytar, blazing baseball caps and an awesome Kickstarter project.
On Thursday, Tesla Motors announced that they are open sourcing all electric vehicle patents. This may allow smaller companies to get in to the market but ultimately will help create a common platform.
Whilst the hobbyist maker may not have the means to create an electric vehicle of their own, this kind of move could be the gold standard on how 3D printer manufacturers should behave.
Greig, the Theremin Hero, has created a keytar by mashing a NES, guitar hero controller, 3 mini Arduinos, a raspberry pi and some other bits and bobs.
Over on his channel there are renditions of Games of Thrones and Star Trek The Next Generation themes. He’s working on a build video so be sure to subscribe to his YouTube channel.
This week’s wearable project over on Adafruit is the Sound Reactive LED Baseball Cap. It uses the Adafruit Arduino compatible wearable platform – FLORA.
The project has uses a mic to pick up sound from the environment and the LEDs light up depending on the intensity of the sound. It looks like an awesome project to do. Whoever if you’re looking for a more formal look there’s a similar project using a tie!
This week’s awesome Kickstarter project is Lil’Bot.
The Lil’Bot is a self balancing robot that allows you or your kids to learn about robotics and hacking. The bot is Arduino compatible and can be programmed using Blockly, a Scratch like visual programming tool. If this interests you why not back the project now?
Once again, thanks for watching, remember to subscribe for your weekly dose of maker news.
Hit me up @chalkers on twitter if you have any stories you’d like me to cover. If they don’t make it into the show I’ll include them as notable mentions in the show notes.
Hello World, and welcome to That Maker Show with me, chalkers, your host to all things new in the maker movement.
This week we’re talking about stargazing smart phones, lunar phase clock, Kinect 2 and an awesome kickstarter project.
Over on Adafruit’s learning system there’s a 3D print project to mount a Celestron FirstScope telescope to a regular camera tripod to give it that extra height. Also in the project there’s an 3D printable adapter to mount your cell phone to the telescope so you can take epic space pictures!
Keeping with the space theme, over on Instructables there’s a project on how to create your own clock that tells the phases of the moon.
It’s a project’s brains is a Raspberry Pi and look’s pretty fun for all you lunatics out there.
Microsoft have announced the pre order phase for the Kinect 2 for Windows. The original Kinect 2 bundled with the Xbox One had a proprietary adaptor which prevented hackers and makers from using it like the original Kinect that was sold seperately for the Xbox 360.
Pre-orders ship in July, with a beta SDK. Stock is limited and once they’ve ran out the next batch will be available for general release later in the year.
I’m excited to see what makers can do with this version!
This week’s awesome Kickstarter project is the PicassoBot.
The PicassoBot is a robotic arm drawbot kit. It is open source, Arduino compatible, and USB powered.
Kits start at $75 and looks really fun to play with and great project for geeky parents to work on with their kids.
Once again, thanks for watching, remember to subscribe for your weekly dose of maker news.
Hit me up @chalkers on twitter if you have any stories you’d like me to cover. If they don’t make it into the show I’ll include them as notable mentions in the show notes.
Hello World, and welcome to That Maker Show with me, chalkers, your host to all things new in the maker movement.
This week we’re talking about a DIY drink mixing robot, a privacy pocket, a drawbot and an awesome kickstarter project.
Want to build your own build your own automated drink mixing robot? Maker Yu Jiang, in part one of his tutorial shows you what you need and how to put the robot together. It costs about $180 to make the robot. His next tutorial will go over the software side. Keep your eyes on his blog to see it when it comes out.
Adafruit’s Becky Stern uses a silver plated knit fabric to create a pocket or pouch for the privacy contentious.
Putting a your smartphone in this pocket will block WiFi and cell reception but it won’t block NFC tags. This is a extremely straight forward tutorial to follow and is a simple first wearable project!
Over on the MAKE magazine’s blog there was ]a project posted called the TRS Drawbot. It’s a simple drawing robot with two servos that are controlled by audio output through a regular audio jack.
Just reading this project and watching the accompanying video makes feel that much more smarter!
This week’s awesome Kickstarter project is Mr Beam.
Mr Beam is a DIY open source laser cutter and engraver kit. Mr Beam can be used on paper, wood, plastic, leather and other materials.
The endgame of the Mr Beam project is to make laser cutters easy to use and enjoyable for everyone.
Once again, thanks for watching, remember to subscribe for your weekly dose of maker news.
Hit me up @chalkers on twitter if you have any stories you’d like me to cover. If they don’t make it into the show I’ll include them as notable mentions in the show notes.